

I think it’s safe to say that all of us who do meditation retreats have experienced at least stiffness or a few twinges in the back. Human bodies aren’t designed to sit like statues for hours on end.
For some, these issues come and go. For others, however, especially those with previous injuries, back pain can be a debilitating problem during a retreat. It’s very hard to meditate when all you can focus on is the pain in your spine!
Fortunately, back pain doesn’t have to be the end of your spiritual career. In this article, let’s take a closer look at how you can protect your back during a meditation retreat, relieve your pain and prevent future problems.
Position yourself for success
Posture has a huge effect on how well your back weathers a retreat. Granted, even if you have perfect posture, there’s no guarantee you’ll never have back pain during meditation. But if you’re stiff, slumping or sitting unevenly, you’ll be very lucky not to have some problems after a few days. So what makes a good posture for meditation?
- Most importantly, the back should be straight and upright, maintaining the natural curves of the spine.
- You should sit equally balanced over both sitting bones.
- The knees should be lower than the hips, allowing the lower back to balance without strain.
- The chest should be open, with the shoulders relaxed back and down.
- The head should be neutral with the chin parallel to the floor.
In general, it’s a feeling that your buttocks are anchored to the floor while a string at the top of your head is gently pulling you towards the sky.
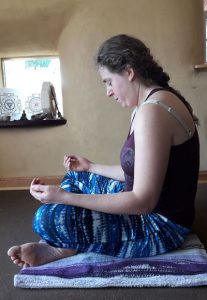
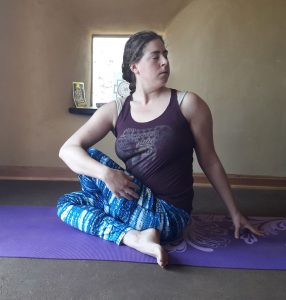
Bad posture: back is rounded, shoulders slump forward, head falling down and knees too high.
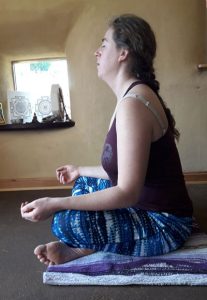
Another bad posture: leaning forward, the shoulders are sinking down and the neck arching back.
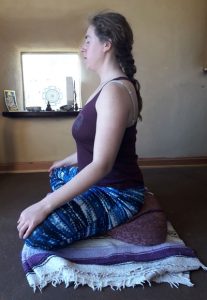
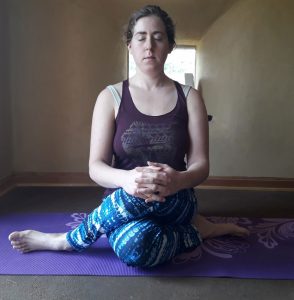
Correct, balanced meditation posture. Notice that the hips are higher than the knees, the head is level and the back is aligned.
You may find it useful to use one of the classical positions for meditation. These four are the most common:
Sukhasana: The “easy pose,” also known as just sitting cross-legged. It’s the simplest way to sit on the ground, but after a while it can lead to slumping and put stress on the lower back. Sitting on a cushion will help keep healthy alignment. You can also support the knees with cushions if they don’t rest on the floor.
Sukhasana: The “easy pose,” also known as just sitting cross-legged. It’s the simplest way to sit on the ground, but after a while it can lead to slumping and put stress on the lower back. Sitting on a cushion will help keep healthy alignment. You can also support the knees with cushions if they don’t rest on the floor. Sukhasana, or sitting cross-legged, is easy and comfortable for many people.
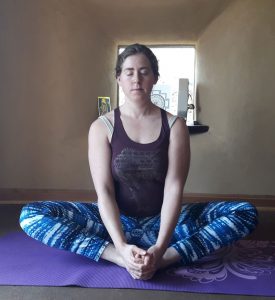
Siddhasana: The “pose of perfection,” siddhasana is perhaps the most stable pose for long meditations. First bring the left heel to touch the perineum, so you’re almost sitting on the heel with the leg folded. Then tuck your right toes into the crease between the thigh and calf of the left leg. The right heel rests against the pubic bone. It takes a bit more flexibility to get into siddhasana, but if you can sit comfortably like this, you’ll find it provides a very stable base and ‘locks’ your lower back into a natural upright position. Siddhasana, a classical meditation posture, is stable to maintain for a long time.
Vajrasana: For the “thunderbolt pose,” come from kneeling to sit with your buttocks on your heels. The heels should be brought out slightly to create a bowl for the buttocks. Hands rest folded on your lap. You might want to put a cushion under them so your shoulders can stay upright. This pose is very balanced but it’s hard on the knees if maintained for a long time.
There are many modifications you can make with cushions to take the pressure off. Most simply, either place a small cushion between your heels and buttocks, or pile a few small cushions between your legs to sit on.
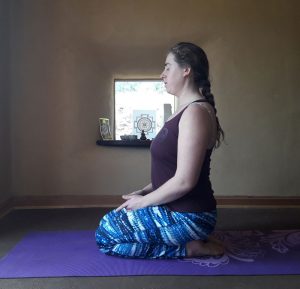
Vajrasana is a stable and upright meditation posture that easily maintains the natural curves of the spine.
Virasana: The “hero’s pose” is complicated to describe but pretty simple to perform, and it’s very friendly to the back. To do it on the left side, first bend the right leg so the knee is directly in front of you and the heel is touching the left buttock. Then cross the left leg over the right so that the knees are on top of each other and the left foot is touching the ground, towards the right buttock. You can also sit with the right leg on top, whichever is more comfortable for you. If this is your main meditation posture, you can sit mostly on the side that’s most comfortable, but be sure to sit sometimes on the opposite side so you don’t create an imbalance. A cushion under the buttocks makes it much easier to sit in virasana for extended periods.
These last two – vajrasana and virasana – give the most support and alignment to a sensitive back. They are also the two poses that will not aggravate sciatica, and might help relieve it.
A final note on posture: When you go deep in meditation, the muscles relax and you might gradually start slumping or leaning off to one side. Perfect posture isn’t the goal of meditation, so don’t get stuck on it, but you have to make sure you’re not hurting yourself without realizing it. It helps to check in with your body every so often. If your posture has really degenerated, correct it very slowly and with awareness of every movement.
Virasana is a seated meditation posture that supports the lower back and can relieve sciatica.
Use props to support your meditation posture
During a retreat, use all the props and tools that are available to you. Don’t get stuck on the image of a perfect yogi sitting effortlessly on bare ground: it doesn’t matter what it looks like but what it feels like!
Cushions are the most basic tool to support your posture. If possible, take a few more than you think you’ll need so you can experiment throughout the retreat. As I mentioned earlier, in most sitting poses it’s important to have a cushion under the buttocks. Lifting the hips keeps the lower back from rounding backwards and helps you maintain a healthy position without strain.
The trick with cushions is that they should slant forwards.
Otherwise, your hips are still basically on a flat surface, not much better than the ground. Some meditation cushions, especially the “half moon” shaped ones, are designed to tilt your hips in this way. If you only have flat ones, position yourself so your sitting bones are right on the edge of the cushion. You’ll feel how your pelvis tips slightly forward. This puts your hips and lumbar spine in the healthiest, most stable position. In general, sitting higher will allow your back to be more relaxed (and take some strain off of your knees). So don’t skimp on the cushions!
Another excellent prop to keep your back safe is the meditation bench. This is a small, tilted bench that you can sit on as if in vajrasana but with your hips comfortably supported above the floor. Add cushions to make the seat as high as you need. You can buy a meditation bench online or, if you’re a bit handy, make one yourself.
Finally, the most effective and underappreciated meditation prop for people with back problems: the chair. Many people have a lot of resistance or shame about meditating in chairs. There’s absolutely no reason for this! Again, what’s important is not what you look like while meditating but what’s happening on the inside. Using a chair doesn’t make you any less spiritual.
On the contrary, feeling more comfortable means you can focus on your meditation, and you can keep your body more pain-free in the long run. Sitting in a chair, or alternating between a chair and the floor, is a great way to rest your back. It also gives your hips and knees a break. There are a few points to consider for an ergonomically correct meditation position in a chair:
- Firm base. Make sure the seat of your chair is firm and solid, and don’t try to pad it with a lot of blankets. A soft seat won’t give your back the support it needs.
- Correct height. With your feet placed flat on the floor, your knees should be at a 90-degree angle with thighs parallel to the ground. If the seat is too low, lift yourself by sitting on a cushion. If it’s too high, lift the ground by placing a cushion under your feet.
- Tilt pelvis. Just like when sitting on the ground, your pelvis should be tilted slightly forward. You can do this by sitting on the edge of a low cushion.
- Sit upright. Avoid the temptation to lean back against the chair. An upright posture is still important here. If you need extra support, you can sit a few inches from the back of the chair, and place a thick cushion between your sacral area and the chair back.
- Hands elevated. When the hands rest directly in the lap, it often drags the shoulders forward and down, making a slump in the upper back. Instead, keep them on a cushion so your elbows are at closer to a 90-degree angle.
Often people get held back in meditation simply because their body is uncomfortable. You might not even realize that this is what’s causing pressure and agitation while you meditate. So if you’ve been struggling for a while with sitting on the floor, definitely give the chair a shot! It might jumpstart the quality of your meditation on the spot.
Prepare your body for meditation
So now you’re all set up for a back-friendly meditation, but what can you do off the cushion to prepare your body for pain-free sitting? Your body is probably not used to being totally still for so many hours every day, and this alone can cause stress. Walk as much as you can during breaks (you can even practice walking meditation!). Try to let your body relax and move naturally. Stretching is a very good idea before meditation. You can do some simple warm-up’s or a few minutes of yoga.
Hatha yoga is a very important element, both for preparing your body for meditation and keeping your back healthy in the long run.
I strongly recommend doing yoga every day during a meditation retreat. Outside of your full practice, do a few asanas for the back before any long meditation session. Taking the spine through its full range of motion helps maintain the health of the intervertebral discs, encourages flexibility and blood circulation, and prevents calcification of the vertebrae.
Any movement is better than no movement, but some asanas are particularly valuable:
- Backbends. Back-bending, chest-opening poses like bhujangasana, ardhachandrasana, ushtrasana or setubandhasana counteract the normal tendency of the back to round forward over long hours of sitting. Practiced gently, they prevent and relieve back pain. (But really, be gentle! Never push yourself in these poses. If your problems are in the lower back, ask a yoga teacher for modifications.)
- Cat pose. Marjaryasana (“cat pose” or “cat-cow”) alternates between arching and rounding the back. It’s a great way to loosen the back, release tensions and restore the natural curves of the spine.
- Twists. Twisting poses, especially ardha matsyendrasana, work wonders on the spine. Just be sure to stretch tall through the back before going into any twist.
- Hip-openers. More flexible hips will allow you to maintain a better seated posture. Bhadrasana (“butterfly pose”) is a simple and very effective asana for helping you sit more easily, taking stress off of your back.
Cat pose, performed by arching and rounding the back, improves flexibility of the spine and works out any tension.
Cat pose, rounding stage. Breathe out in this position and inhale when arching.
Other recommended yoga poses for a healthier back
Ardhachandrasana – elongates the spine and reverses the effects of slumping. Enter this asana by first stretching up and then leaning backwards, so you are lengthening the spine more than bending it. The hips push forward. You can tighten your buttocks to protect the lower back or place your hands on your lumbar area for support. It’s a demanding asana to hold for long, so practice it in a few rounds. If you feel dizzy, open your eyes and come out immediately.
Setubandhasana -(bridge pose) restores the natural curves of the spine. This asana is great for restoring the spine to its most natural alignment. Over time, it can even correct scoliosis. Feel that the hips are pushing towards the sky and the chest comes toward the chin. The knees should be at a 90-degree angle. If your arms are not long enough to grab your heels while maintaining this, you can just touch them or leave them palms down on the floor.
Bhujangasana (cobra pose) – opens the chest, makes the spine more flexible and can relieve back pain. When entering this asana, emphasize that you’re stretching the spine longer rather than pushing upwards, to avoid crunching the lower back. Only go up as much as is comfortable. For a restorative modification, practice sphynx pose instead (with forearms resting on the floor).
Ardha matsyendrasana (the “Lord of the fishes” pose or seated spinal twist) – releases tension in the lower back and prevents calcification of the lumbar vertebrae. This is one of the most healing asanas in yoga and very effective for preserving the mobility of the lumbar spine. Practice it after backbends to release any tension and restore the spine to its normal alignment. Perform it first to the left (twisting clockwise), then to the right (twisting counterclockwise, as shown). Always inhale and stretch up through the spine before going in or out of a twist.
Badrasana – opens the hips, making it easier to sit for long sessions without putting stress on the back. Sit on the edge of a cushion to tilt your hips at the right angle. In this asana, be careful that the back stays straight and upright, with the shoulders back and chest open. It’s a very comfortable and beneficial asana to hold for a long time. For this, you might place cushions under your knees to support them if they don’t touch the ground.
Going to the root of back pain – holistic approach for reducing back pain.
Yoga can also address the cause of back pain at a deeper level. A lot of back problems are related to an imbalance in muscle development throughout the body. The human body works as a holistic integrated system, where motion (or stillness) is created by the balanced action of opposing parts. When you move any part of your body, one set of muscles contracts and the other releases. It’s easy to understand that if one side of a muscle pair is much more developed than the other, it will apply force unequally and pull the bones out of alignment.
For example, if you work a lot to strengthen your core abdominal muscles but neglect your back muscles, the front of your body will become tight and exert more pressure. The back won’t have the power to support itself. Hence, back pain.
Yoga can either correct an imbalance or, if practiced carelessly, make it worse.
It’s important here to take a careful look at your yoga practice, or seek guidance from a teacher, to see if you’re over-emphasizing one part of your body at the expense of another.
You might feel that one side or the other is naturally stronger than the other, and you’ll have to modify your practice to compensate for it. In general, be sure to include asanas that strengthen and stretch both front and back. (Poses that increase strength do it by contracting those muscles, so you’ll need to stretch that side also to balance it out.) Asanas with two sides (like trikonasana or garudasana) must be practiced equally on the left and right.
A balance of backbends and forward bends helps maintain back health. However, don’t go straight from an extreme backbend to a deep forward bend (or vice versa) without a neutral resting pose in between.
Finally, always warm up before doing backbends! Overzealous backbends are a common cause of problems even in those with healthy backs. Start with mild flexion and go deeper only as is comfortable, focusing on elongating the spine as it bends.
Does your back pain come from your emotions?
Sometimes, the key to handling back pain is actually what happens in the mind. All too often, we take pain as something to fight against. We try to suppress it, ignore it or push through it. Afraid to show weakness, we feel ashamed if we can’t hide it.
In reality, pain is simply a way that the body communicates with us. After all, usually we only notice a body part when it starts causing problems! Pain is the body trying to tell us that something isn’t right, that something needs attention. This is a very positive thing.
We all want our bodies to work well for us. For this to happen, we need to honor the body, to respect its limits and give it the care it needs. Never try to push through pain. A little discomfort is one thing, but if your body is really hurting, change what you’re doing.
Sit in a chair, do whatever stretches are helpful and change meditation positions often. Be sensitive and attentive to what your body needs. In short, learn to direct awareness, compassion and skillful action towards yourself, as part of your spiritual practice.
You don’t need to feel guilty about having pain. Instead, listen to what your body is telling you. Do you have an old injury that needs more care? Do you need to exercise more or change the way you’re exercising? Do you have a repressed emotional issue that’s creating a physical problem? Pain in the lower back in particular is often associated with suppressed emotional pain.
Of course, not all back pain is psychosomatic. Injuries, sciatica, strain and degenerative conditions certainly account for many cases. However, current research shows a close connection between back pain and stress, anxiety and other mental factors – even in cases where nothing can be found physically wrong with the back. This is a huge topic so I won’t go into the details here, but essentially, when intense emotions like stress, anger or fear are suppressed, the brain redirects these impulses to form a contraction in another part of the body. The pain becomes a sort of lid over the emotions you don’t want to feel.
The good news is that if your back pain actually started in your mind, a meditation retreat is the best thing you can do for it! Meditation, especially in a strong process like a retreat, allows you to bring loving awareness to your subconscious patterns. It brings detachment, so you can experience those suppressed emotions and allow their energy to dissipate without overwhelming you.
Conclusion
Back pain during a meditation retreat is something that almost all of us will experience sooner or later. For those who have severe pain that regularly interferes with their practice, take hope that there are many possible solutions. Changing your meditation posture, using more props and a rehabilitating yoga practice might make your next retreat much more comfortable.
Also keep in mind that many retreat centers, including Diamond Mountain, will have a professional masseuse on hand to help with any issues that flare up during a retreat. The bottom line is that back health is vitally important for everyone. Whether you need healing now or you’re just concerned to prevent future problems, take care and be attentive to it.
This way, meditation and yoga can be a joy to you for the rest of your life.